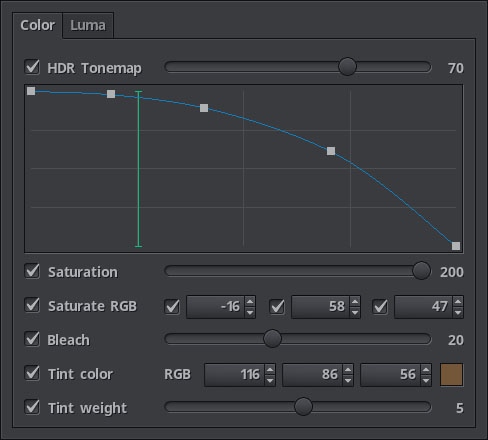
The color tab is subdivided into two tabs, color and luma. Inside Color are the settings that directly change pixel color, on the Luma tab settings related to its luminosity.
The color correction pipeline is based on a trilinearly interpolated 16 bit per channel 3D Lut regardless of the channel bitness that is automatically chosen by the post processing pipeline for its buffers.
Other than HDR Tonemap that is obviously frame dependant, everything is calculated only once when some option is modified and the resulting color transformation is stored on the Lut, so the whole process is quite fast, meaning only one texture tap per pixel plus tonemapping.
There are many options, and they have been chosen by their algorithmic uniqueness, by how unique their mathematical formulation is, compared to the other color correction options.
HDR Tonemap enables and disables tonemapping, the slider controls the strength of the effect.

The curve editor controls how much tonemapping is to be applied based on the actual frame's luma which is indicated by the green vertical line inside the editor, the indicator reacts in real time and is a close fast approximation of the current luma.
Obviously the effect is an approximation to true HDR Tonemapping, given that each frame is rendered only once and there is only one exposure to work with.
The algorithm is based on Jim Hejl and Richard Burgess-Dawson's one, adapted to work inside the fpsc's pipeline.
It works by trying to emulate the ability of the human eye to adapt to different lightning conditions, for example, if you wait long enough in a dark place your eyes will adapt and you will start to see more of your enviroment.
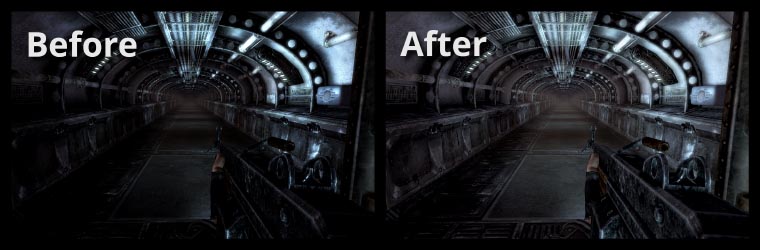
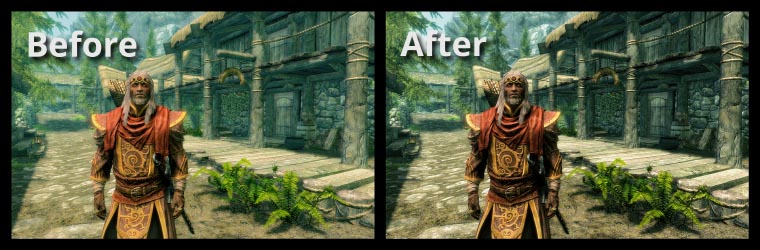
The tonemapping effect is a good way of seeing in the shadows or really dark places, you decide how much using the curve editor, still, there has to be some amount of starting luminance to work with, complete black is too dark and that cannot be changed.
Usually an eye adaptation time delay is used to mimic this progression, the fpsc's has no such delay because from an injector's perspective everything is scene data and this is not true inside a game, rather than add too much complexity (as is game dependant) to something so simple, I've chosen not to, meaning tonemapping adaptation time is instantaneous.
Saturation enables and disables the general color saturation of the scene, the slider controls how much, it goes from -100 completely desaturated all the way up to 200.
It works on the three rgb channels at the same time and is very similar to a color vibrance algorithm althought not really quite the same, as this is a stronger effect.
Saturate RGB option enables and disables per color channel saturation, the actual amounts are changed on the updown controls besides it.
This is the same algorithm as the general saturation but applied to each color channel separatedly.
They can be used together with the general saturation to get a finer control over the game's saturation not possible with only one saturation control.
Bleach enables and disables the bleach bypass effect, the slider controls the strength of the effect.
It emulates a film process used in movies and photography.
Tint color enables and disables color tinting, and the rgb updown controls determine the color of the tinting, this effect can have a very noticiable impact on game look and feel.
Tint weight controls the strength of the color tinting effect, when this option is disabled the fpsc will use a default value of 10%.
Unlike the previous version, tint weight can have a negative value. The tint color effect was originally designed as a way to compensate for excessive default general tinting found on some games, the process consisted on finding the complementary color of the tint than was to be removed from the game, and use it as tint color, it wasn't perfect but it worked pretty well.
By using a negative color tinting value, this process is simplified as the tint color becomes a 'run away from' color, if the scene is generally too blue you set that particular blue color tone as tinting color and a negative value indicating how much to run away from it.
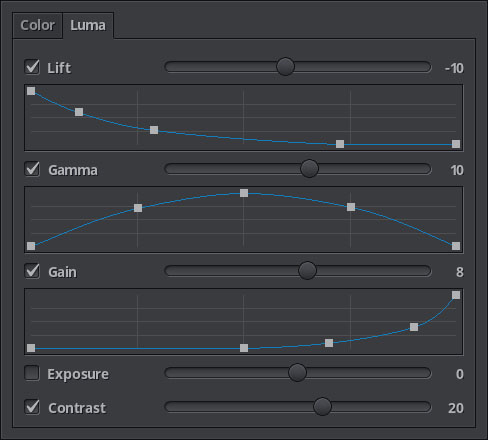
Lift, Gamma, Gain is the most advanced way of controling image brightness, three separated algorithms whose primary purpouse is to get a finer control on the general luminosity of an image.
Lift simply raises rgb values, Gain does the same thing using multiplication, Gamma is just a simple exponential function that does the same on its own way.
It is usually said that lift works on lower tones, gamma on medium and gain on higher tones, now you can actually decide how much of it is actually true.
The sliders of each option control the strength of the effect, but the curve editors allow you to precisely control this strength depending on the actual pixel luma, limiting the effect to the pixel luma ranges of your choosing.
Exposure enables and disables the exposure effect, the slider controls its strength. Exposure is very similar mathematically speaking to gamma, but it's a much, much stronger effect, think of it as a hardcore way of raising or reducing overall image brightness.
Contrast enables and disables the image contrast effect, the slider controls its strength. This is another strong powerful effect, very different from the rest yet quite simple, increases the difference among pixels by moving their luma away from the middle.